 0
0
 0
0
You’ve planned the route, checked the Washington weather forecast, and packed your boots. But when you hoist your gear, your shoulders scream, your back aches, and that old duffel bag feels like it’s fighting you with every step. Finding the right camping backpack for men in WA isn’t just about storage—it’s about surviving the Cascade elevation gains and the Olympic Peninsula’s unpredictable drizzle without wrecking your body. The problem is that most guys grab the first oversized pack off the shelf, and then pay for it for years. The solution isn’t complicated—it’s about matching your torso length, pack volume, and suspension system to the specific type of trekking you actually do. Let’s cut through the marketing noise and get you fitted with a pack that feels like part of your body.
How Do You Measure Your Torso Length for a Backpack?
You measure your torso length from the bony bump at the base of your neck (C7 vertebra) down to your iliac crest, which is the top of your hip bones. This measurement, not your overall height, determines which pack size you need. A common mistake is buying a “large” pack because you’re 6’2″, but if you have a short torso, that pack will sit too low and ruin your center of gravity.
Step-by-Step Guide to Measuring Torso Length
To get this right, you’ll need a soft measuring tape and a friend (or a wall). Here is the exact process:
- Tilt your head forward and find the prominent vertebra at the base of your neck.
- Place your hands on your hips with thumbs pointing backward. You should feel the top ridge of your pelvis—that’ll be your iliac crest.
- Have your friend measure the distance between the C7 vertebra and the middle of your iliac crest, keeping the tape straight and following the curve of your spine.
- Record the number in inches. This is your torso length.
Using the Size Chart to Pick Your Pack Frame
Once you have your torso measurement, compare it directly to the manufacturer’s size chart. As a general rule:
- Short torso (15–17 inches): Typically requires a Small frame.
- Regular torso (17–19 inches): Typically requires a Medium frame.
- Long torso (19–21+ inches): Typically requires a Large frame.
Most good outdoor brands offer adjustable harness systems that let you fine-tune the fit, but starting with the correct frame size is non-negotiable. If your torso length falls between sizes, try the smaller pack first—it’s easier to adjust a tight fit than to cinch down a pack that’s too long.
What Size Camping Backpack Do You Need for Washington Trails?
For most weekend trips in Washington, you need a pack in the 50–70 liter range. If you’re doing a single overnight and you’re an ultralight packer, a 40-liter pack works. For multi-day trips that require a bear canister (common in the Olympic National Park backcountry) or a winter setup, you’ll want 70 liters or more. The key is to match volume to your gear, not to your ambition for “having extra space.”
Matching Pack Volume to Trip Duration
Here’s a practical breakdown based on how long you’ll be out and the season:
| Trip Type | Pack Volume (Liters) | Typical Gear Load |
|---|---|---|
| Day Hike / Summit Push | 15–25 L | Layers, food, water, first aid, rain shell |
| 1–2 Overnight Trips (Summer) | 35–50 L | Sleeping bag, pad, tent, stove, food |
| 3–5 Day Trips (3-Season) | 50–70 L | Full shelter, extra food, water filter, clothing |
| 7+ Days / Winter / Glacier | 70–85 L | Crampons, ice axe, extra fuel, bulky insulation |
Why Bigger Isn’t Always Better
Buying a massive 80-liter pack for a weekend trip is a classic rookie mistake. Not only does it encourage you to overpack, but it also adds unnecessary weight to your base load—often 4 to 5 pounds just for the empty pack. A smaller, lighter pack forces you to be efficient, keeps your center of gravity closer to your back, and makes those steep switchbacks on Mount Si or Mailbox Peak significantly less miserable.
Which Pack Suspension System Works Best for Men’s Bodies?
The best suspension system for men is one that transfers the weight of the pack from your shoulders to your hips with 80% of the load resting on your pelvis. A rigid internal frame with a properly contoured hip belt is non-negotiable for any trail that has more than 1,000 feet of elevation gain. You want a system that creates a gap between the pack and your lower back to allow airflow, but which locks the load tight during scrambles.
Internal Frame vs. External Frame
For 99% of hiking scenarios in Washington, an internal frame pack is the right choice. Here’s why:
- Internal Frame: Hugs your body, keeps the weight close to your spine, and provides better balance on uneven terrain.
- External Frame: Carries weight higher and offers more ventilation, but it is obsolete for most modern hikers due to poor balance and bulkiness.
Key Suspension Features to Look For
When you’re testing packs, pay attention to these specific features that separate a good carry from a great one:
- Hip Belt Padding: Look for dense, memory-foam padding that wraps around your iliac crest without leaving gaps.
- Load Lifters: These straps connect the top of the pack to the frame. When tightened, they pull the pack into your shoulders rather than letting it lean backward.
- Torso Adjustability: Packs with a sliding or interchangeable harness allow you to fine-tune the fit as you layer up or lose weight during the season.
When Should You Choose a Lightweight vs. Heavy-Duty Pack?
You should choose a lightweight pack (under 3 pounds) when your base gear weight is under 15 pounds and you’re moving fast on well-graded trails. You should choose a heavy-duty pack (4 to 6 pounds) when you’re carrying climbing gear, heavy food bags, or winter equipment. The choice hinges entirely on your total load weight and the ruggedness of the terrain.
Assessing Your Base Gear Weight
Weigh your “big three” items—tent, sleeping bag, and sleeping pad. If those total more than 12 pounds, you need a pack with a beefier frame and a suspension system rated for 50 pounds or more. If you’re a gram-counter who sleeps in a tarp and uses a 2-pound quilt, a frameless pack might be viable, but only if you’re comfortable with a load under 20 pounds total,Looking to save money on your next adventure? Check out our guide on the best Budget Travel Backpack for Any Trip to find affordable options that don’t compromise on durability.
The Durability Trade-off in the PNW
Washington’s brushy, wet trails demand a pack that resists abrasion and repels water. A lightweight “dynema” pack might save weight, but it can tear on a fallen branch in the Hoh Rainforest. Heavy-duty packs usually feature 500-denier Cordura nylon or higher, which withstands the punishing scrub of the Pacific Crest Trail. You need to decide if you’re prioritizing speed or longevity.
How Should a Camping Backpack Fit on Your Hips and Shoulders?
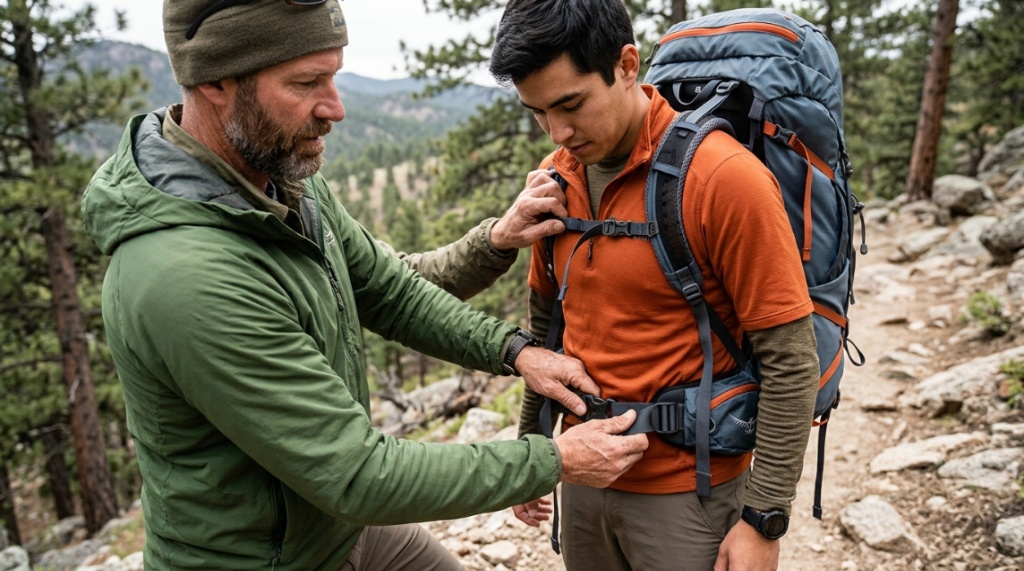
A correctly fitted pack should feel like the hip belt is gripping your pelvis with the shoulder straps barely touching your shoulders. You should be able to slip a flat hand between the shoulder strap and your shoulder with some friction, but no pressure points. The hip belt’s padding should extend at least one inch beyond your hip bones on the sides to distribute the load.
Dialing in the Hip Belt First
Start by loosening all straps, putting the pack on, and buckling the hip belt directly over your iliac crest—not your waist. Tighten the buckle and pull the hip belt cinch straps forward until the belt is snug but not restricting your breathing. The weight of the pack should immediately shift from your shoulders to your legs.
Adjusting the Shoulder Straps and Load Lifters
Once the hip belt is set, pull the shoulder straps down and back to take up slack. The straps should wrap over your shoulders and connect to the pack just below your shoulders. Then, tighten the load lifters at a 45-degree angle. This pulls the pack closer to your spine and prevents the “leaning back” effect that kills your lower back on steep sections.
Can You Use a Camping Backpack for Everyday Carry?
Yes, you can use a camping backpack for daily commutes, but it is rarely efficient. The tall, tubular design of a hiking pack makes it awkward for carrying laptops, books, or gym clothes, and the suspension system is overkill for a 10-pound load. You’re better off owning a separate daypack for urban use and keeping the sizeable hiking pack strictly for the trail.
Why Multi-Use Packs Usually Fail
Packs that attempt to be both a climbing pack and a commuter bag often compromise on both designs. The main compartment is too deep for a laptop sleeve, the waist belt is removable (which adds weight), and they lack the organization pockets you need for keys, chargers, and a water bottle that you can grab without removing the pack.
Alternatives for the “One Bag” Traveler
If you want a single bag for travel and hiking, look for a pack with a “clamshell” opening like a suitcase, or a panel-loading design. This allows you to unzip the entire front panel to access your stuff without digging to the bottom. However, these are heavier and often use a less ventilated back panel, making them hotter on the trail.
Why Is Pack Weight Distribution Critical for Men in WA?
Proper weight distribution is critical because Washington’s terrain is defined by steep, sustained climbs and descents that punish bad posture. If the weight rests on your shoulders, you will fatigue within the first hour. If the heavy gear (like your tent) sits at the bottom of the pack, you’ll feel it dragging your shoulders backward and pulling on your lower spine during every descent.
The “Heavy on Top” Rule
Pack your gear so the heaviest items sit high and close to your back, between your shoulder blades. This puts the weight over your center of gravity, which allows your strong leg and core muscles to handle the load rather than your neck and traps. Here’s how to pack your bag:
- Bottom Layer (0-15%): Sleeping bag, lightweight clothing—items you won’t need until camp.
- Middle Layer (15-40%): Cooking gear, food, water filter—medium weight items.
- Top Layer (40-55%): Tent, tent poles, fuel canisters—the heaviest gear.
- Pockets (Outer): Rain jacket, snacks, first aid—gear you need fast.
Stabilizing the Load for Scrambles
Once your pack is loaded, use the compression straps on the sides. These pull the load tight against the frame and prevent the pack from swaying side-to-side when you’re hopping over roots or boulders. A swaying pack is a major source of back pain and a leading cause of twisted ankles on rugged trails like the Enchantments.
What Features Should You Look for in a Rainy Climate?
For the Pacific Northwest, look for a pack with a dedicated rain cover pocket, waterproof zippers, and a fabric that has a durable water-repellent (DWR) finish. No pack is truly “waterproof” unless it’s a dry bag style (like those from Sea to Summit), but these lack breathability and frame support. Your best bet is a standard pack combined with a pack liner.
Using Liners vs. Rain Covers
The debate between a pack liner and a pack cover is easily settled:
- Pack Liner (Trash Compactor Bag): This goes inside your pack. It keeps your gear dry even if the pack is fully submerged. It’s cheap, bombproof, and the standard practice for thru-hikers.
- Rain Cover: This goes over the outside of your pack. It protects against surface rain, but it fails in wind-driven rain and can funnel water down your back if it rides up.
Fabric and Zipper Durability
Check for #10 or #8 YKK zippers which resist corrosion. Also, press on the bottom of the pack—it should feel stiff and reinforced to handle the rough treatment of being set down on wet gravel or rocky summits. Make sure the hip belt pockets are sealed with water-resistant zippers to keep your phone and Snickers bar dry.
How Do You Care for and Maintain Your Backpack?
You care for your backpack by emptying it completely after every trip, brushing off dirt, and storing it loose in a cool, dry place away from direct sunlight. Never put a down sleeping bag in a compression sack for long-term storage, and the same logic applies to your pack—compress it for travel, but allow it to inflate and rest when you’re at home.
Cleaning Your Pack Without Ruining the Coating
To clean your pack, use a sponge, mild soap (like Nikwax Tech Wash), and lukewarm water. Avoid using a washing machine or a pressure washer, as these will strip the DWR coating and damage the foam in the hip belt. Scrub only the dirty areas and hang it to air dry, but never in direct sunlight, as UV rays degrade the nylon.
Repairing Minor Gear Failures
Carry a small repair kit with you on the trail. At minimum, include a needle and heavy thread, a few safety pins, and Tenacious Tape. If a buckle snaps, you can often improvise with a small carabiner. If a seam starts to rip on Day 2 of a 5-day trip, a quick patch with Tenacious Tape and a seam sealer will usually get you home without turning your pack into a black hole for your gear.
Finding the right fit is a process, but once you dial it in, the trails of the North Cascades feel a lot lighter. If you’re ready to upgrade but want to see a curated list of top-rated options that hold up well in the wet and rugged terrain of Washington, check out this detailed guide on the camping backpack for men in WA to narrow down your options with confidence.
What Are the Most Common Backpack Fitting Mistakes?
The most common fitting mistake is placing the hip belt around the waist (the soft part) instead of over the hip bones (the iliac crest). The second most common mistake is leaving the sternum strap too loose, which allows the shoulder straps to slide off your shoulders. Finally, most men buy a pack based on their height, not their torso length.
Ignoring the Sternum Strap
The sternum strap connects the two shoulder straps across your chest. It prevents the shoulder straps from sliding down your arms and into your armpits. For mens’ packs, this strap should sit at the level of your nipples and should have a buckle with an elastic take-up to allow for breathing.
Over-Tightening the Load Lifters
If your load lifters are too tight, they will create a gap between the top of your shoulders and the straps, causing the pack to lean forward into the back of your head. Conversely, if they are too loose, the pack leans backward. They should be snug, but you should still be able to rotate your head without the pack hitting your skull.
Frequently Asked Questions
Should I buy a pack with a built-in rain cover?
Yes, if you hike frequently in the PNW, a built-in rain cover is a convenient feature that ensures you never forget it at home. However, these covers are thin and can fail on windy ridges, so always double-bag your gear in a dry sack or liner as well.
How much does a quality camping backpack cost?
A quality pack from a reputable brand ranges from $200 to $400 for standard models, with premium ultralight versions costing upwards of $500. This is a piece of gear that lasts 10-15 years if taken care of, so it’s worth investing in the best suspension system you can afford.
Can I use a women’s backpack if I’m a man?
While you can, it’s not recommended as the shoulder straps are angled inward for narrower shoulders, and the hip belt is generally flared wider to accommodate hips. Women’s packs also have a shorter torso length on average, which likely won’t fit a male frame correctly.
What is the best way to store a backpack at home?
Store your backpack hanging from a wall hook by the haul loop (the top handle), or lay it flat on a shelf. Never store it on its bottom, as this can flatten the foam in the base. Keep it in a cool, dark place like a closet, not a damp garage.
How do I stop my pack from bouncing when I run?
To stop bouncing, you must cinch the hip belt tightly and use the “load lifters” to pull the pack onto your body. If you are running with a daypack, look for a pack with a “running vest” style shoulder harness. For larger packs, running is not recommended—the bounce is a force multiplier on your joints.
When should I replace my backpack?
Replace your backpack when the zippers fail, the fabric has multiple tears that can’t be repaired, or the internal frame (stays) crack. A general rule is 10 years of heavy use or 15 years of regular use. If the hip belt foam has gone flat and can no longer grip, it’s time for a new pack.